Category: Blog

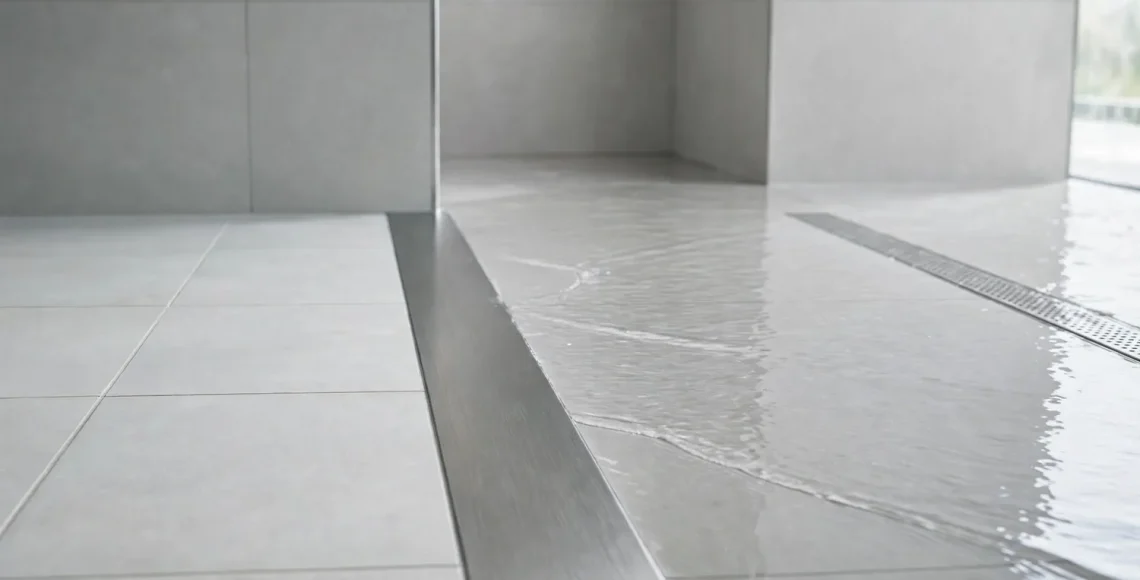
Curbless shower with light gray tiles, water flowing to a stainless steel linear drain

Curbless Showers Explained: Design Ideas, Benefits and What to Plan For

tep into a modern, high-end bathroom and there’s a good chance you won’t step over anything at all. Curbless showers, also known as zero-entry or barrier-free showers, have gone from a niche accessibility feature to one of the most requested upgrades in bathroom design. They look open and elegant, they’re easier to use at every stage of life, and they make even smaller bathrooms feel larger. But a curbless shower requires more careful planning than a standard one. Here’s everything you should know before you commit.

What Is a Curbless Shower?

A curbless shower has no raised threshold between the shower area and the rest of the bathroom floor. The floor continues in one smooth plane, often with the same tile, and water is managed through precise sloping and a well-placed drain instead of a curb that holds it back.

It’s related to, but not the same as, a walk-in shower. A walk-in shower simply means an open shower you can walk into, often without a door, but it may still have a small curb. A curbless shower removes the curb entirely.

Benefits of a Curbless Shower

A More Spacious Look

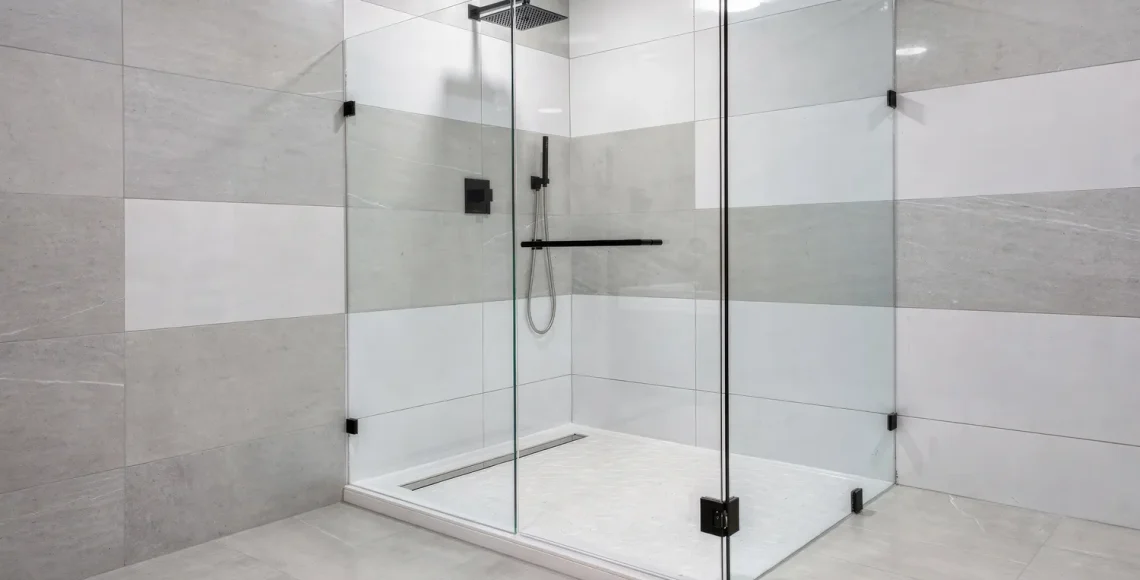
Without a curb breaking up the floor, the eye reads the whole bathroom as one continuous space. Paired with frameless glass, a curbless shower can make a modest bathroom feel dramatically bigger, a principle we also covered in how to make your bathroom look even more beautiful.

Easier Access for Everyone

No curb means no tripping hazard. Curbless showers are easier for young children, older adults, anyone recovering from an injury, and wheelchair users. Even if accessibility isn’t a concern today, it’s one of the best ways to future-proof your home, something we highlighted in our list of bathroom remodel mistakes to avoid.

Simpler Cleaning

With no curb, there’s one less edge where soap scum and grime collect. A single continuous floor is also easier to mop and maintain.

Strong Appeal for Future Buyers

Accessible, spa-style bathrooms appeal to a wide range of buyers, from young families to people planning to age in place.

Curbless Shower Design Ideas

Continuous Floor Tile

Running the same tile from the bathroom floor straight into the shower creates the most seamless look. Large-format porcelain tiles in stone or concrete finishes are especially popular because they minimize grout lines.

Linear Drain Along the Back Wall

Placing a long, slim drain against the back wall lets the floor slope in a single direction. This allows large tiles to be used on the shower floor and keeps the drain almost invisible.

Tile-Insert Drains

Some linear drains accept a strip of the same tile used on the floor, so the drain blends into the surface completely. Only a thin slot remains visible.

Fixed Glass Panel Instead of a Door

A single fixed glass panel keeps water contained while leaving the entry open. Without a door to swing, the space feels calm and uncluttered.

Wet Room Layout

In a wet room, the shower and sometimes the tub share one fully waterproofed zone with no enclosure at all. It’s a bold, European-inspired design that works well in bathrooms with a generous footprint.

What to Plan For Before Building a Curbless Shower

Here’s the part that matters most. A curbless shower isn’t just a regular shower with the curb removed. Because there’s no barrier holding water back, everything depends on how the floor is built.

Recessing the Subfloor

To create a slope toward the drain without raising the shower floor above the bathroom floor, the subfloor in the shower area usually needs to be lowered. In wood-framed homes, this can involve modifying floor joists, which must be done in a way that keeps the structure sound. On concrete slabs, it may mean cutting and recessing the slab. This structural step is the main reason curbless showers are easiest to include during a full bathroom remodel.

Choosing the Right Shower Pan System

Curbless showers typically rely on a low-profile or zero-entry shower pan, often a pre-sloped foam system with bonded waterproofing. If you’re unfamiliar with how pans work, read our guide before making decisions.

Waterproofing Beyond the Shower

Since water can travel past the shower’s edge, it’s smart to extend waterproofing onto the bathroom floor outside the shower area. Many designers waterproof the entire bathroom floor for extra peace of mind.

Drain Placement and Capacity

The drain must handle the full flow of your showerhead, especially with rain showers or multiple heads. A linear drain at the entry or back wall, combined with correct slope, keeps water where it belongs.

Glass and Splash Control

Shower size and glass placement determine how much water escapes. A larger shower with the showerhead aimed away from the opening performs best.

Flooring Transitions

Because the floor is continuous, your floor tile choice has to work both inside and outside the shower. Choose a tile with good slip resistance when wet. Our guide to the best flooring for bathrooms explains what to look for.

Can Any Bathroom Have a Curbless Shower?

Many can, but not all. The framing, subfloor type, joist direction, and what’s located below the bathroom all affect what’s possible. Second-floor bathrooms, older homes, and bathrooms above finished ceilings each have their own considerations. An experienced contractor will evaluate the structure before recommending the right approach. In some cases, a very low curb or a shallow threshold offers a practical compromise that still feels open.

Converting an existing tub into a curbless shower is also a popular project, since the tub area already has plumbing in place. It simply needs to be planned with the subfloor and drainage in mind from the very beginning.

Why Curbless Showers Need Professional Installation

Curbless showers are one of the most technically demanding bathroom projects. Slope, drain alignment, structural changes, and waterproofing all have to be exactly right, because with no curb there’s no margin for error. That’s why choosing an experienced installer matters so much, a topic we cover in detail in how important it is to choose the right remodeling contractors. For general standards on tile and wet-area installation, the Tile Council of North America is a helpful reference.

Create an Open, Accessible Bathroom

A curbless shower brings together beauty, safety, and long-term value in a way few other upgrades can. At Arthur’s Decorating Inc., we design and build curbless and walk-in showers for homeowners in Buffalo Grove, Barrington, Libertyville, and the surrounding suburbs. See examples of our work in the gallery, then contact us to find out what’s possible in your bathroom.

What Is a Shower Pan? Types, Standard Sizes and How to Choose One for a Tiled Shower

When homeowners picture a new shower, they usually think about tile, glass, and fixtures. But the part that matters most for the life of your bathroom is the one you’ll never see once it’s finished: the shower pan. It’s the foundation of the entire shower, and if it’s chosen or installed poorly, even the most beautiful tile won’t save the bathroom from leaks. Here’s what every homeowner should know before choosing one.

What Is a Shower Pan?

A shower pan is the waterproof base of a shower. It sits beneath the floor surface, slopes toward the drain, and directs every drop of water into the plumbing instead of into the subfloor or the ceiling below. In some showers, the pan is also the visible floor surface, such as a one-piece acrylic or fiberglass base. In tiled showers, the pan is a hidden waterproof layer beneath the tile.

The term is often used loosely, so you’ll hear “shower pan,” “shower base,” and “shower tray” used interchangeably. What really matters is understanding which system your shower uses, because each works differently.

The Main Types of Shower Pans

Prefabricated Acrylic or Fiberglass Pans

These are one-piece molded bases with the slope and drain opening built in. They’re lightweight, quick to install, and have no grout lines to clean. The trade-off is flexibility: they come in fixed sizes and shapes, they look less custom, and lower-quality versions can flex or crack over time if the subfloor isn’t properly supported.

Solid-Surface and Cast Stone Pans

Made from engineered stone or mineral composites, these pans feel heavier and more substantial than acrylic. They’re popular in modern bathrooms because they offer a sleek, low-profile look with a solid feel underfoot, and some can be cut to size.

Traditional Mortar Bed Pans

The classic method for tiled showers involves a sloped mortar base, a flexible waterproof liner, and a second mortar layer on top that the tile is set into. Done correctly, a mortar bed pan can last for decades and can be built to virtually any shape. It does, however, depend heavily on the skill of the installer, since the slope, liner, and drain connections all have to be precise.

Foam Tile-Ready Shower Pans

Tile-ready pans are pre-sloped foam bases designed to be covered with a waterproofing membrane and tiled directly. Systems from manufacturers such as Schluter have become very popular with professional installers because they provide a consistent slope, integrate with bonded waterproofing, and allow tile to be installed on top for a fully custom look.

Linear Drain Pans

Instead of sloping toward a center drain, these pans slope in one direction toward a long, narrow drain along one edge of the shower. This design allows large-format tile on the shower floor and is the go-to choice for curbless and walk-in showers.

Standard Shower Pan Sizes

Prefabricated pans are sold in common dimensions that fit typical bathroom layouts. Some of the most frequently used sizes include:

  • 32″ x 32″ – a compact square option for small bathrooms and corner showers.
  • 36″ x 36″ – a more comfortable square shower, popular in hall bathrooms.
  • 48″ x 36″ – a rectangular size that fits many alcove showers.
  • 60″ x 30″ or 60″ x 32″ – designed to replace a standard bathtub in the same footprint.
  • 60″ x 36″ and larger – roomy walk-in showers, often with space for a bench.

Neo-angle and corner shapes are also widely available. Keep in mind that local building codes set minimum shower dimensions, and comfort matters just as much as code. A shower that technically fits may still feel cramped every morning.

With a custom mortar bed or a cut-to-size tile-ready pan, you’re not limited to these sizes at all. That flexibility is one of the main reasons homeowners choose a tiled shower when they remodel their bathroom.

Prefabricated vs Tile-Ready: How to Choose

Consider Your Design Goals

If you want a seamless, custom look where the floor tile coordinates with the walls, a tile-ready or mortar bed pan is the right choice. If simplicity and minimal maintenance are the top priorities, a quality prefabricated base may be all you need.

Think About Your Layout

Oddly shaped or oversized showers usually call for a custom-built pan. Tub-to-shower conversions, on the other hand, often fit standard 60-inch pans perfectly.

Consider Accessibility

If you want a low-threshold or zero-entry shower, you’ll need a pan designed for that purpose, typically with a linear drain and a recessed subfloor. Learn more in our guide to [LINK: Curbless Showers Explained].

Think About Cleaning

Solid pans have no grout, while tiled pans do. Smaller mosaic tiles on a shower floor provide excellent slip resistance thanks to the grout lines, but they require a bit more upkeep. We discuss tile choices like this in our article on the best tile for a bathroom.

What Makes a Shower Pan Work: Slope, Drain, and Waterproofing

Regardless of the type, every shower pan depends on three things.

Slope. Water must flow steadily toward the drain. The widely accepted guideline is about a quarter-inch of fall per foot. Too little slope leaves puddles; too much makes the floor feel uneven underfoot.

Drain connection. The joint between the pan and the drain is one of the most common failure points in any shower. It has to be sealed perfectly and matched to the pan system.

Continuous waterproofing. The pan must connect seamlessly to the waterproofing on the walls, including corners, curbs, benches, and [shower niches]([LINK: Shower Niche Ideas]). Gaps in these transitions are exactly where hidden leaks begin.

Reference standards from the Tile Council of North America outline these methods in detail, and experienced installers follow them closely.

Signs of a Failing Shower Pan

Because the pan is hidden, problems often show up elsewhere first. Watch for:

  • Water stains or bubbling paint on the ceiling below the bathroom.
  • Loose or cracked floor tiles in the shower.
  • Grout that stays dark long after showering.
  • A musty smell that doesn’t go away with cleaning.
  • Soft spots in the floor near the shower.

If you notice any of these, act quickly. Long-term leaks can cause serious damage to framing and subfloors, and in some cases require water damage restoration before a new shower can be built.

Why Shower Pan Installation Isn’t a DIY Project

Plenty of bathroom tasks are DIY-friendly. Building a shower pan isn’t one of them. An error in slope, liner placement, or drain sealing can stay hidden for months and then cause damage well beyond the bathroom. That’s why we always recommend professional installation, as we explain in why hiring bathroom contractors is better than DIY. You’ll also find related advice in our post about bathroom remodel mistakes to avoid, including the importance of planning where water flows.

Build Your Shower on the Right Foundation

The shower pan is the part of your bathroom you’ll never see, and that’s exactly why it deserves the most attention. At Arthur’s Decorating Inc., we build tiled and custom showers across Buffalo Grove, Lake Zurich, Arlington Heights, and nearby communities using proven waterproofing systems and precise tile installation. Take a look at our gallery and contact us when you’re ready to plan your new shower.

Shower Niche Ideas: How to Add Smart Storage and Style to Your Shower

Few bathroom upgrades deliver as much everyday satisfaction as a well-designed shower niche. Instead of balancing shampoo bottles on the tub ledge or hanging a rusty caddy from the showerhead, a niche gives everything a permanent, built-in home. It also happens to be one of the best opportunities to add a design moment to your shower. In this guide, we’ll walk through the most popular shower niche ideas, how to plan placement and size, and what separates a niche that looks great for decades from one that causes problems.

What Is a Shower Niche?

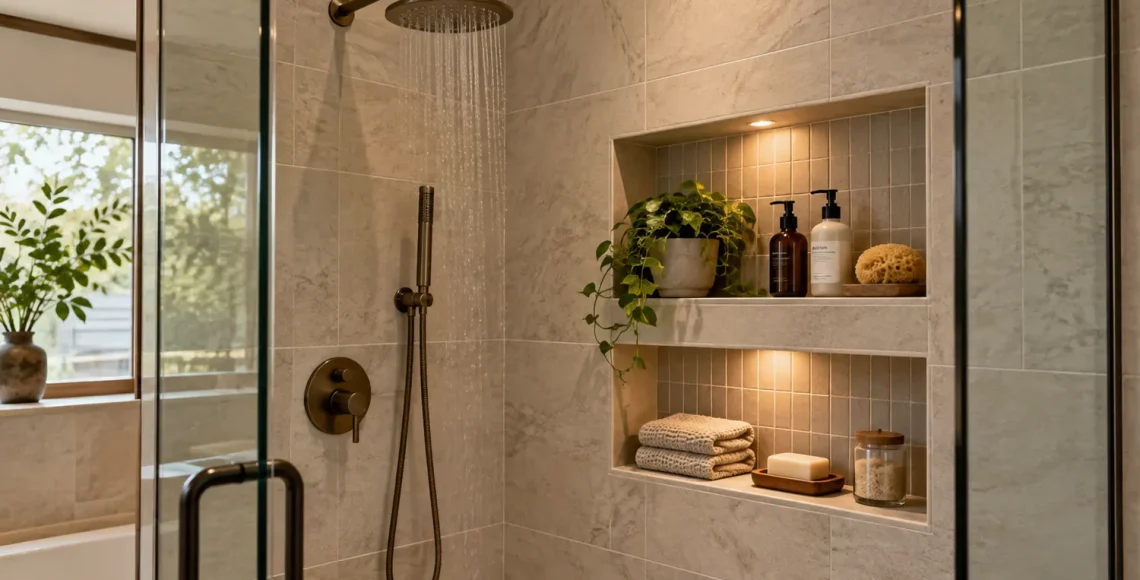
A shower niche is a recessed shelf built into the wall of a shower, set between the wall studs so it sits flush with the tiled surface. Because it doesn’t protrude into the shower, it saves space and looks clean and intentional. Niches are typically framed during the construction phase of a bathroom remodel, waterproofed along with the rest of the shower, and finished with the same tile as the walls, or with an accent tile that makes them stand out.

Popular Shower Niche Ideas

The Classic Horizontal Niche

A wide, horizontal niche is the most common choice, and for good reason. It holds several bottles side by side, lines up naturally with horizontal tile patterns, and feels balanced on most shower walls. For a seamless look, align the top and bottom edges of the niche with grout lines so that the tile flows uninterrupted around it.

The Tall Vertical Niche

A vertical niche works beautifully in narrow showers or next to a shower column. You can add one or two glass or stone shelves inside to create multiple storage levels, keeping taller bottles on the bottom and smaller items such as razors or soap bars higher up.

The Double Niche

In a shower shared by two people, two separate niches, or one long niche divided into sections, keeps everyone’s products organized. A lower niche can also be placed near a shower bench for shaving or for kids’ products.

The Accent Tile Niche

This is where a niche becomes a design feature. Lining the back of the niche with mosaic, glass, marble, or a patterned tile creates a focal point without overwhelming the shower. Many homeowners use this approach to introduce a bold color or texture they wouldn’t want on an entire wall. If you’re still deciding on materials, our guide to which tiles are best for bathroom walls covers the pros and cons of each option.

The Full-Width Ledge Niche

Rather than a framed box, some modern showers feature a long recessed ledge running across the entire back wall. It reads as architectural rather than decorative and pairs especially well with large-format tile and minimalist fixtures.

The Lit Niche

Integrated LED strip lighting along the top of a niche adds a soft glow that makes the shower feel like a spa. Because it involves wiring in a wet area, this detail must be planned with properly rated fixtures and installed correctly from the start.

Where Should a Shower Niche Go?

Placement is where many niche projects go wrong. A few guidelines help:

Choose an interior wall. Building a niche into an exterior wall means removing insulation, which can lead to condensation and cold spots inside the wall. Interior walls are almost always the better choice.

Keep it out of the direct spray. A niche positioned directly under the showerhead collects water and soap residue constantly. Placing it on the side wall or on the same wall as the valve keeps it more accessible and easier to clean.

Think about who uses the shower. A comfortable height for most adults is somewhere between chest and eye level, so bottles are easy to reach without bending. If you have children, or if you want the bathroom to remain comfortable as you age, a second, lower niche is a smart addition.

Plan around plumbing and framing. Pipes, valves, and structural framing determine what’s possible behind the wall. This is one reason niches are best designed before demolition and framing begin, not after.

How Big Should a Shower Niche Be?

Size depends on your wall framing and your storage needs. In a standard wall, a niche naturally fits between two studs, which works well for a typical row of shampoo and conditioner bottles. Wider niches are absolutely possible, but they require the framing to be modified with a header, which is routine work during a remodel.

A good rule of thumb is to measure your tallest bottles and add a few inches of clearance. It’s also worth sizing the niche around your tile, so that the opening is defined by full or evenly cut tiles rather than thin slivers. Thoughtful sizing is one of the details that separates a custom-looking shower from an average one.

Finishing Details That Make a Difference

Sloped Sills

The bottom of a niche should have a very slight slope toward the shower so water drains out rather than pooling inside. It’s a small detail you won’t notice visually, but it prevents standing water, soap buildup, and mildew.

Edge Treatments

The edges of a niche can be finished with mitered tile corners, bullnose tile, or a metal edge profile. Mitered corners offer the most refined look, while metal trims give a crisp, modern outline and protect tile edges from chipping.

Shelf Materials

Solid-surface, quartz, marble, or porcelain shelves can be used as the niche sill or as dividing shelves inside it. Using the same stone as your vanity top ties the whole bathroom together.

Grout and Sealing

Niches see a lot of moisture and product residue, so high-quality grout and proper sealing matter. Epoxy or high-performance grout can make cleaning easier over the long term.

The Most Important Part: Waterproofing

A shower niche is essentially a hole in your shower wall. If it isn’t waterproofed correctly, water can find its way into the framing, causing mold, rot, and damage that stays hidden until it becomes serious. Proper waterproofing means the niche is treated as part of a continuous waterproof system, with sealed inside corners, membranes wrapped into the recess, and careful transitions at every edge.

This is also why prefabricated foam niche inserts are popular with professionals: they integrate with modern waterproofing systems and give a consistent, square opening. Organizations such as the Tile Council of North America publish installation standards that experienced installers follow for exactly these wet-area details.

It’s the same reason we often recommend leaving shower construction to experienced tile installers. As we explained in why hiring bathroom remodeling contractors is a better option than DIY, mistakes behind the tile are the most expensive ones to fix.

Common Shower Niche Mistakes to Avoid

Homeowners and inexperienced installers tend to make the same handful of mistakes:

  • Placing the niche on an exterior wall.
  • Building it too small to fit standard bottles.
  • Forgetting to slope the bottom sill.
  • Letting the niche opening cut tile into awkward, uneven pieces.
  • Skipping or rushing the waterproofing.

For more planning pitfalls that go beyond the shower, see our article on bathroom remodel mistakes you must avoid.

Niches and the Rest of Your Shower Design

A niche works best when it’s planned together with everything else: the shower pan, the drain, the valve location, the glass, and the tile layout. If you’re considering a larger shower upgrade, you may also want to read our guides on [LINK: What Is a Shower Pan?] and [LINK: Curbless Showers Explained], both of which affect how the finished shower looks and performs.

Ready to Design a Shower You’ll Love?

A well-planned shower niche adds function, personality, and value to your bathroom. At Arthur’s Decorating Inc., we design and build custom showers throughout Buffalo Grove and the surrounding suburbs, from waterproofing and framing to precise tile work around every niche and shelf. Browse our project gallery for inspiration, then contact us to talk through your ideas.

Which Tiles Are Best for Bathroom Walls? A Complete Guide to Choosing the Perfect Finish

Which Tiles Are Best for Bathroom Walls? A Complete Guide to Choosing the Perfect Finish

Choosing the right tiles for your bathroom walls is one of the most important decisions you’ll make during a bathroom remodel. Wall tiles do much more than enhance the appearance of your space—they protect your walls from moisture, improve durability, and make everyday cleaning easier. With so many materials, colors, sizes, and finishes available, selecting the perfect tile can feel overwhelming. That’s why working with experienced bathroom remodeling and tile installation professionals can make the entire process easier and ensure outstanding results.

Ceramic Tiles – A Timeless Choice

Ceramic tiles continue to be one of the most popular options for bathroom walls. They are affordable, easy to maintain, and available in a wide variety of colors, patterns, and textures. Whether you’re creating a modern bathroom or a more traditional design, ceramic tiles offer the flexibility to match almost any style while providing excellent moisture resistance.

Porcelain Tiles – Built to Last

Porcelain tiles are an excellent option for homeowners looking for durability and long-term performance. Because they are denser than ceramic, they resist water, stains, and daily wear exceptionally well. Large-format porcelain tiles have become increasingly popular because they create a sleek, seamless appearance with fewer grout lines, making the walls easier to clean and maintain.

Natural Stone – Elegant and Unique

Natural stone tiles, including marble, travertine, slate, and limestone, bring timeless beauty and character to any bathroom. Since every stone tile has its own unique pattern, no two bathrooms look exactly alike. However, natural stone requires proper sealing and expert installation to protect it from moisture and preserve its appearance for years to come.

Glass Tiles – Bright and Stylish

Glass tiles are perfect for creating eye-catching accent walls, shower niches, or decorative borders. Their reflective surface helps brighten the room and can make smaller bathrooms feel larger. Because glass is delicate and requires precise cutting, professional installation is essential for achieving a flawless finish.

Choosing the Right Size and Finish

The size and finish of your tiles can dramatically change the overall look of your bathroom. Large tiles create a clean, modern appearance and reduce the number of grout lines, while smaller tiles allow for creative patterns and decorative details. Glossy finishes reflect more light, making bathrooms feel brighter, while matte finishes provide a softer, more elegant look.

Why Professional Tile Installation Matters

Even the highest-quality tiles can fail to impress if they are installed incorrectly. Uneven walls, poor waterproofing, misaligned grout lines, or improper preparation can lead to costly repairs in the future. Professional bathroom remodeling and tile installation specialists understand every step of the process, from preparing the surface to ensuring perfect alignment and long-lasting durability.

Experienced installers can also help you choose the best tile material based on your budget, design preferences, and maintenance expectations. Their expertise ensures your bathroom not only looks beautiful but also performs reliably for many years.

Transform Your Bathroom with Expert Craftsmanship

Selecting the right bathroom wall tiles is only the first step toward creating a beautiful and functional space. Professional installation is what truly brings your vision to life and protects your investment for the future.

Our team specializes in complete bathroom remodeling and professional tile installation, helping homeowners create bathrooms that combine style, durability, and lasting value. From selecting the ideal wall tiles to delivering precise installation and exceptional attention to detail, we’re committed to providing results you’ll enjoy every day. When you’re ready to upgrade your bathroom, trust experienced professionals to deliver a finish that’s built to last.

What Color to Paint Kitchen Cabinets

What Color to Paint Kitchen Cabinets Instead of Plain White for Perfect Match to All Types of Homeowners

White kitchen cabinets have been popular for years because they look clean, bright, and easy to match with almost any kitchen design. However, plain white is not always the best choice for every home. In some kitchens, white cabinets can feel too simple, too cold, or too similar to every other kitchen design.
If you are wondering what color to paint kitchen cabinets instead of plain white, the answer depends on more than just current design trends. The best cabinet color should match the kitchen layout, natural light, countertops, flooring, and most importantly, the people who live in the home. A calm couple, a busy family with kids, an active household, or someone who loves hosting guests may all need a different cabinet color.
Kitchen cabinets are one of the largest visual features in the room. Their color affects the mood, style, and daily feeling of the space. The right choice can make the kitchen feel warmer, more elegant, more practical, or more personal.

Why Plain White Is Not Always the Best Choice

Plain white cabinets can look beautiful, but they are not perfect for every kitchen. They can show dirt, fingerprints, and wear more easily, especially in homes where the kitchen is used heavily every day. In some spaces, white cabinets can also feel flat if there is not enough contrast from countertops, flooring, hardware, or backsplash.

White Can Feel Too Basic

A completely white kitchen can look clean, but it can also lack depth. If the walls, cabinets, counters, and backsplash are all light, the room may feel unfinished or too plain. Adding color to the cabinets can make the kitchen feel more designed and intentional.

White May Not Fit Every Lifestyle

A busy family with children may not want cabinets that show every smudge. A homeowner who loves warm, cozy spaces may find plain white too cold. Someone who enjoys bold design may want something with more personality. That is why choosing the right cabinet color should depend on how the kitchen is used every day.

Cabinet Colors for Calm and Relaxed Homeowners

Some people want their kitchen to feel peaceful, soft, and comfortable. They do not want bold colors or dramatic contrast. For calm homeowners, the best cabinet colors are usually muted, warm, and easy on the eyes.
  • Soft Greige Cabinets
Greige is one of the best alternatives to plain white. It blends gray and beige, creating a soft neutral color that feels warm but still modern. Greige cabinets work well for people who like quiet, balanced interiors.
This color is ideal for homeowners who want the kitchen to feel relaxed without looking boring. It pairs beautifully with white quartz countertops, light wood flooring, black hardware, brushed nickel fixtures, and natural stone backsplashes.
  • Warm Beige Cabinets
Warm beige cabinets are perfect for a soft and welcoming kitchen. Beige adds more warmth than white but still keeps the space light. It works especially well in homes with natural wood, cream walls, warm tile, or stone countertops.
This is a great choice for people who enjoy a cozy home atmosphere. Beige cabinets can make the kitchen feel comfortable, calm, and easy to live in.
  • Taupe Cabinets
Taupe is another strong option for relaxed homeowners. It feels more sophisticated than beige and warmer than gray. Taupe cabinets are elegant without being too bold, making them a good choice for people who want a timeless look.
Taupe works well with both modern and traditional kitchens. It also looks great with brass hardware, soft white walls, and natural textures.

Cabinet Colors for Active and Busy Homeowners

Some households are always moving. People cook often, rush in and out, prepare meals quickly, and need a kitchen that looks good without requiring constant cleaning. For active homeowners, cabinet color should be practical, durable-looking, and not too delicate.
  • Medium Gray Cabinets
Medium gray is a smart option for a busy kitchen. It hides marks better than plain white and still feels modern. Gray cabinets work with many countertop colors and can fit both simple and high-end kitchen designs.
This color is good for homeowners who want something practical and clean without going too dark. It can handle a busy lifestyle while still looking polished.
  • Mushroom or Warm Gray Cabinets
Mushroom is a soft mix of gray, beige, and brown. It is warmer than standard gray and more forgiving than white. This color is especially good for kitchens that get daily use because it does not show every small mark as quickly.
Mushroom cabinets work well with light countertops, wood flooring, black accents, and simple tile backsplashes.
  • Charcoal Lower Cabinets
If the kitchen has upper and lower cabinets, charcoal can be used on the lower cabinets to create a practical two-tone design. The darker lower cabinets help hide scuffs and everyday wear, while lighter upper cabinets keep the kitchen open.
This is a strong choice for active households that want style and function at the same time.

Cabinet Colors for Families With Kids

Families with children often need a kitchen that feels warm, friendly, and forgiving. Cabinets may get touched often, and the space needs to feel comfortable rather than too formal. In this case, cabinet colors should be durable-looking, soft, and easy to maintain.
  • Sage Green Cabinets
Sage green is one of the best cabinet colors for family kitchens. It feels calm, natural, and welcoming. It adds personality without becoming too bright or overwhelming.
Sage green works especially well with wood accents, white countertops, cream backsplashes, and black or brass hardware. It creates a warm family-friendly feeling while still looking stylish.
  • Warm Greige Cabinets
Greige is also a great option for families because it is neutral but not plain. It gives the kitchen warmth and hides everyday marks better than pure white. It also works with many design styles, which makes it easier to update the kitchen later.
Families who want a safe but attractive cabinet color may find greige to be one of the best choices.
  • Two-Tone Cabinets for Family Kitchens
A two-tone kitchen can work very well for families. For example, light upper cabinets with darker lower cabinets can make the kitchen feel bright while keeping the most-used areas more practical.
Good combinations include warm white with sage green, beige with charcoal, or greige with navy. This gives the kitchen personality while keeping it functional.

Cabinet Colors for People Who Love Hosting Guests

Some homeowners use the kitchen as a social space. They cook for friends, host family gatherings, and want the kitchen to feel impressive when guests visit. For these people, cabinet color can be a design statement.
  • Navy Blue Cabinets
Navy blue cabinets create a bold and elegant look. Navy feels rich and stylish, but it is still more timeless than many brighter colors. It is a great choice for homeowners who want their kitchen to stand out.
Navy works best when balanced with lighter countertops, bright walls, and good lighting. It also looks beautiful with brass hardware and natural wood accents.
  • Deep Green Cabinets
Deep green cabinets can make a kitchen feel custom, warm, and memorable. This color works well for people who like a more dramatic but still natural design.
Deep green pairs well with marble-style countertops, warm wood, gold hardware, and soft neutral walls. It can create a kitchen that feels elegant and personal.
  • Black or Soft Black Cabinets
Soft black cabinets can create a high-end kitchen look. This color is best for homeowners who want something bold, modern, and sophisticated. It works especially well in larger kitchens or kitchens with strong natural light.
Black cabinets should usually be balanced with lighter countertops and warm accents so the room does not feel too heavy.

Cabinet Colors for Creative and Bold Homeowners

Some people do not want a kitchen that looks like everyone else’s. They want color, character, and a space that reflects their personality. For creative homeowners, cabinet color can be more expressive.
  • Dusty Blue Cabinets
Dusty blue is a great option for people who want color without making the kitchen feel too loud. It feels fresh, unique, and relaxed. This color works well in coastal, cottage, transitional, and modern kitchens.
Dusty blue cabinets pair nicely with white counters, natural wood, chrome fixtures, and light backsplashes.
  • Olive Green Cabinets
Olive green is a strong choice for homeowners who like earthy, stylish interiors. It feels warmer and deeper than sage green. Olive cabinets can make a kitchen feel unique while still staying connected to natural design.
This color works well with wood floors, cream walls, stone counters, and matte black hardware.
  • Terracotta or Clay-Toned Cabinets
For a warmer and more creative look, soft terracotta or clay-inspired cabinet colors can add a lot of personality. These tones work best in kitchens with natural textures, warm lighting, and simple surrounding colors.
This choice is not for everyone, but it can look beautiful in the right home.

Cabinet Colors for Homeowners Who Want a Luxury Look

If the goal is to make the kitchen feel more expensive, cabinet color should create depth, contrast, and elegance. Luxury does not always mean choosing the darkest color. It means choosing a color that feels intentional and polished.
  • Charcoal Cabinets
Charcoal cabinets can make a kitchen look refined and upscale. They are less harsh than pure black but still bold enough to create drama. Charcoal works especially well with marble-style countertops, gold hardware, and warm lighting.
This color is good for homeowners who want a sleek and mature design.
  • Creamy Beige Cabinets
Creamy beige can also feel luxurious when paired with the right finishes. It creates a soft, elegant kitchen that feels warm and high-end. This color works well with natural stone, brass fixtures, and wood accents.
Creamy beige is especially good for homeowners who want luxury without dark colors.
  • Deep Taupe Cabinets
Deep taupe is a beautiful choice for a sophisticated kitchen. It feels warmer than gray and more modern than brown. It can make the kitchen feel custom without being too trendy.

Cabinet Colors for Small Kitchens

Small kitchens need cabinet colors that help the space feel open but not boring. Plain white is often used in small kitchens, but it is not the only option.
  • Light Greige Cabinets
Light greige is one of the safest alternatives to white in a small kitchen. It keeps the room bright while adding more warmth and depth. It also works with many countertop and backsplash styles.
  • Soft Blue Cabinets
Soft blue can make a small kitchen feel airy and fresh. It adds color without making the room feel closed in. This color works especially well with natural light.
  • Light Sage Cabinets
Light sage is another good choice for a small kitchen. It feels natural and soft, and it can make the room feel more personal than plain white.

Cabinet Colors for Resale Value

If you are painting kitchen cabinets before selling a home, it is usually best to avoid overly bold or unusual colors. The goal is to choose a color that feels updated but still appeals to many buyers.
  • Best Resale-Friendly Colors
Greige, taupe, warm beige, soft gray, and light sage are some of the safest choices for resale. These colors feel modern without being too personal.
  • Colors to Use Carefully
Navy, charcoal, black, and deep green can look beautiful, but they should be used carefully if resale is the main goal. In the right kitchen, they can add value. In a dark or small kitchen, they may feel too heavy for some buyers.

How to Match Cabinet Color With Countertops

When deciding what color to paint kitchen cabinets, countertops should be one of the first things you consider. The cabinet color and countertop color need to work together.
  • White Countertops
White countertops work with almost any cabinet color. Greige, sage, navy, charcoal, beige, and taupe can all look good with white counters. The choice depends on whether you want the kitchen to feel soft, bold, warm, or modern.
  • Dark Countertops
If your countertops are dark, lighter cabinet colors usually work best. Beige, light greige, cream, or soft sage can create balance and prevent the kitchen from feeling too heavy.
  • Warm Stone Countertops
Countertops with beige, brown, or gold tones usually look best with warm cabinet colors. Beige, taupe, mushroom, olive, and warm greige are strong choices.

How to Match Cabinet Color With Flooring

Flooring has a major effect on how cabinet colors look. A color that looks great with one floor may not work as well with another.
  • Light Wood Floors
Light wood floors work well with sage green, greige, beige, navy, and soft gray cabinets. They create a fresh and natural look.
  • Dark Wood Floors
Dark floors often need lighter or medium cabinet colors. Warm beige, taupe, light greige, and soft gray can help balance the darker floor.
  • Tile Floors
Tile floors can be cool or warm depending on the color. Gray tile usually works well with greige, charcoal, navy, or soft blue. Beige tile usually works better with warm neutrals, sage, or taupe.

Choosing a Cabinet Color by Personality

A kitchen should feel like it belongs to the people who use it every day. Color can help create that feeling.
  • For Calm People
Soft greige, taupe, warm beige, and light sage are excellent choices. These colors create a peaceful and relaxed kitchen.
  • For Busy People
Medium gray, mushroom, charcoal lowers, and two-tone cabinets are practical and stylish. They help the kitchen look clean even with daily use.
  • For Families With Kids
Sage green, warm greige, beige, and two-tone designs are great options. They feel friendly, warm, and more forgiving than plain white.
  • For Social Homeowners
Navy, deep green, charcoal, and soft black can make the kitchen feel more impressive. These colors work well for people who enjoy hosting.
  • For Creative Homeowners
Dusty blue, olive green, clay tones, and unique two-tone combinations can make the kitchen feel personal and memorable.
  • For Resale-Focused Homeowners
Greige, taupe, soft gray, warm beige, and light sage are usually the best choices. They feel updated but still appeal to many people.

If you are wondering what color to paint kitchen cabinets instead of plain white, the best answer depends on your home, your kitchen, and your lifestyle. Plain white can be beautiful, but it is not the only clean and timeless choice.
Calm homeowners may prefer greige, taupe, or beige. Busy households may benefit from medium gray, mushroom, or two-tone cabinets. Families with kids often do well with sage green or warm neutrals. People who love hosting may choose navy, deep green, charcoal, or soft black. Creative homeowners may enjoy dusty blue, olive, or clay-inspired colors.
The best cabinet color should make your kitchen look better and feel more natural for the way you live. When the color matches both the design of the room and the character of the people in the home, the kitchen becomes more than just a place to cook. It becomes a space that feels comfortable, personal, and truly finished.
What Is the Best Tile for a Bathroom? A Homeowner’s Guide

What Is the Best Tile for a Bathroom? A Homeowner’s Guide

Choosing the best tile for your bathroom can feel overwhelming – there are countless styles, materials, and price points. But the right tile doesn’t just make your bathroom look great; it also impacts durability, maintenance, safety, and long-term value. So which tile truly works best for a bathroom? Let’s break down the top options and why professional installation makes all the difference.

Porcelain Tile – The Top Choice for Most Bathrooms

Porcelain is often considered the gold standard. It’s dense, waterproof, durable, and available in endless styles – stone-look, marble-look, wood-look, matte, glossy, and more. Because porcelain absorbs very little moisture, it performs exceptionally well in showers and high-humidity areas. It’s also scratch-resistant and easy to maintain, making it a long-lasting investment.

Ceramic Tile – Affordable and Stylish

Ceramic tile is another popular choice. While not as dense as porcelain, it still offers great performance at a more budget-friendly price. Ceramic is ideal for bathroom floors and walls, and it comes in unbeatable color and pattern variety. However, ceramic tiles can be more prone to cracking, which is why proper installation is essential.

Natural Stone Tile – High-End and Luxurious

If you want a spa-like bathroom, natural stone tiles such as marble, slate, and travertine create stunning results. Stone brings character and elegance, but it requires sealing and regular maintenance to prevent staining and moisture damage. It’s beautiful – but only when installed and cared for correctly.

Mosaic Tiles – Perfect for Style & Safety

Mosaic tiles are great for shower floors thanks to their grout-rich surface that provides excellent slip resistance. They add both design interest and practicality, especially in walk-in showers.

Why Professional Installation Matters

Even the highest-quality tile can fail if installed incorrectly. Uneven floors, improper waterproofing, wrong adhesives, and poor grout work can lead to cracks, leaks, and mold behind the walls. That’s why working with professionals is the smartest choice. Experts ensure your bathroom is properly waterproofed, leveled, and finished – so your investment lasts for years.

If you want a bathroom that’s beautiful, safe, and built to last, our team is here to help. Contact us today to schedule your tile installation or bathroom remodeling project!

How Much Do Tile Installers Charge

How Much Do Tile Installers Charge? Everything You Need to Know Before Your Project

Planning a home renovation can be exciting, but it also comes with questions—especially when it comes to budgeting. One of the most common questions homeowners ask is: how much do tile installers charge? While exact numbers vary, understanding the factors that influence pricing can help you plan your project more effectively and avoid unexpected surprises.

What Influences Tile Installation Costs?

The cost of hiring a professional tile installer depends on several key factors:

Type of Tile

Different tiles require different levels of expertise and preparation. Ceramic, porcelain, and natural stone all have unique characteristics. Some are easier to work with, while others may need specialized cutting tools or careful handling.

Size of the Area

Naturally, larger areas take more time and effort to tile, which can affect the overall cost. Even a small bathroom or kitchen area might require careful planning to ensure a professional finish.

Complexity of the Layout

Straight, simple installations are generally quicker and simpler, while patterns, mosaics, or diagonal layouts require more precision and skill. If your project involves detailed cuts around corners, fixtures, or unusual shapes, it can take additional time and expertise.

Location and Availability

Labor rates can vary depending on your region and the availability of skilled tile installers. Urban areas or regions with higher demand may see higher rates, while areas with more competition might offer more affordable options.

Preparation and Repairs

Often, the surface where tiles will be laid needs preparation. This could include leveling floors, repairing walls, or removing old tiles. These tasks add to the complexity of the project and, consequently, the labor involved.

How Installers Usually Charge

Tile installers typically use one of two approaches: per area or per hour.

Per Area: Many installers calculate costs based on the total space being tiled. Larger spaces or complicated layouts may require more time and skill.
Per Hour: Some installers prefer to charge based on the time needed to complete the job, which can fluctuate depending on the project’s difficulty.

Knowing these methods can help you compare quotes more effectively and understand what you are paying for.

Extra Considerations

Beyond labor, there are other elements that can influence the overall cost:

Materials: Tiles, adhesive, grout, and underlayment all contribute to the total project. Some materials are easier to install than others, which can affect labor requirements.
Special Treatments: Certain tiles may need sealing or extra finishing to maintain durability and appearance.
Removal or Prep Work: Old tiles, damaged surfaces, or uneven floors require preparation that may add time and effort.

Finding the Right Tile Installer

Choosing the right professional is just as important as understanding costs. Here are some tips:

Get Multiple Quotes: Compare different installers to see the range of approaches and services offered.
Check Reviews and References: Past clients’ experiences can reveal reliability and quality of work.
Ask About Experience: Skilled installers can handle more complex projects efficiently.
Clarify What’s Included: Ensure that your estimate covers labor, materials, and any necessary preparation work.

Key Takeaways

While it’s natural to wonder how much do tile installers charge, the more important step is understanding what affects the cost and how to plan accordingly. Factors like tile type, project size, layout complexity, and surface preparation all play a role.

Investing in professional installation ensures a durable, high-quality finish that can last for years. By asking the right questions and doing careful research, you can find an installer who meets your needs while keeping your renovation project stress-free.

Can Bathroom Tile Be Painted?

If you’re thinking about giving your bathroom a fresh new look without the hassle of a full remodel, you might wonder: can bathroom tile be painted? The good news is, yes, bathroom tile can be painted, but there are a few important things to consider before you take the plunge.

Understanding the Process

Painting bathroom tile is an affordable way to change up the look of your space without the expense and effort of replacing the tiles entirely. However, this isn’t a simple DIY project that anyone can tackle without preparation. The first thing to note is that not all bathroom tiles are ideal candidates for painting. For example, glossy ceramic tiles or tiles that are exposed to a lot of moisture, like those in the shower, might require more attention and a special kind of paint designed for high-traffic, high-moisture areas.

Types of Paint for Bathroom Tile

When asking, can bathroom tile be painted, it’s crucial to choose the right type of paint. The most suitable paint for bathroom tiles is epoxy or a specific tile and grout paint. These paints are designed to adhere strongly to ceramic, porcelain, and other types of bathroom tile. Not only do they create a durable finish, but they are also water-resistant, which is essential for a bathroom environment.

Preparation Is Key

Before applying any paint, proper preparation is essential. Start by thoroughly cleaning the tile surfaces to remove soap scum, grime, and oils. You’ll also need to sand the surface of the tiles slightly to create a rough texture that the paint can adhere to. After sanding, make sure to clean the tiles again to remove any dust or debris.

Advantages of Painting Bathroom Tiles

So, why should you consider painting your bathroom tiles? First of all, it’s cost-effective. Replacing old tiles can be expensive, while painting them offers a more budget-friendly solution that can achieve a similar transformation. You can choose from a wide variety of colors and finishes, from matte to glossy, to create the look you want.

Additionally, painting your bathroom tiles is an excellent way to update an outdated design without committing to a complete overhaul. If your bathroom feels stuck in the past due to old-fashioned tiles, painting can give it a modern and refreshed appearance in just a few days.

How Long Does Painted Tile Last?

When properly applied and cared for, painted bathroom tiles can last for several years. Of course, how long the paint holds up depends on factors like the type of paint used, how much moisture the tiles are exposed to, and how well the paint is maintained. If you have tiles in a high-moisture area like the shower, the paint may need to be touched up or replaced more often.

Conclusion

So, can bathroom tile be painted? Absolutely! With the right preparation, tools, and paint, you can transform your bathroom tiles into something fresh and new. However, it’s important to approach the process carefully, selecting the right materials and ensuring you follow the necessary steps to get the best results. If you’re looking for a professional bathroom remodeling service, our team can help you make the most of your bathroom space. Whether you decide to paint or opt for a full tile replacement, we’re here to guide you through the process.

Are you ready to refresh your bathroom? Contact us today to discuss your remodeling options and get started on your next project!

Why Hiring Bathroom Remodeling Contractors Buffalo Grove Is Better Option Than DIY

Many people who are stranded at home are looking for possible DIY projects to keep them occupied. However, there are a few drawbacks to trying certain remodels, particularly in the bathroom such as doing the bathroom floor tiles Buffalo Grove. This room contains plumbing infrastructure, necessary waterproof finishes, and other complicated bath goods or materials. Instead, it may be preferable to engage a professional contractor to do your shower installation or bathtub replacement.

Hiring a professional contractor has several advantages for homeowners who are unable to complete a DIY job. Taken together, these benefits might make hiring an expert worthwhile.

Contractors May More Easily Get Materials And Fixtures For Your Bathroom.
Most contractors will already have a variety of wholesale suppliers in place to purchase the supplies required for your bathroom remodeling Buffalo Grove at a lower cost. Contractors also often collaborate with large companies to facilitate product installation. Even better, many firms have factory educated these contractors to utilize their products appropriately for long-term outcomes.

Contractors Do The Project As Quickly As Possible.
You are a busy person with a full life. That DIY bathroom renovations Buffalo Grove will almost certainly be delayed and pushed back many times before it’s finished, all while you attempt to enjoy your house without interruption. A contractor is hired to concentrate entirely on your small bathroom remodel Buffalo Grove and will most likely work tirelessly to complete it as quickly as feasible.

A Contractor May Do More Complicated Bathroom Remodels.
Most homeowners are not confident enough in their plumbing skills to handle more complicated remodels. Allow a qualified and experienced contractor like Arthur’s Decorating Inc. to assist you in understanding the plumbing system of your tub or shower area so that nothing is destroyed or inappropriately connected.

Trained Installers Do More Skilled Installations.
You will make a few blunders as a DIYer during the makeover. These little flaws may not be visible in a new shower or bath wall surround, but you will always be aware of their presence. Contractors have years of expertise and are thus less likely to make errors. Why risk chips, cracks, and peeling if you’re willing to commit to such a large project?

Warranties Are Provided By Contractors To Protect Your New Bathroom Remodel.
Contractors that give workmanship guarantees on their services are also available. These warranties protect you if the bath product was fitted improperly or if the contractor produced any unanticipated harm. If you make a mistake during the bath conversion or tub installation, there will be no workmanship guarantee to safeguard you.

Why You Should Hire A Designer For A Bathroom Remodel

You should think about hiring a designer if you’re performing bathroom renovations Buffalo Grove for the following reasons:

A Designer Can Make Bathroom Remodeling Buffalo Grove Simpler.

You’ll discover that the majority of designers collaborate with renovation firms like Arthur’s Decorating Inc. As a result, they may collaborate with contractors and provide them with design and idea advice for bathrooms.

ProTip Observation: A designer may help you save a lot of time since they’ll make sure everything goes as planned. Additionally, they will let you know how things are doing so that you are constantly up to date.

An Experienced Designer Is Needed.

Designing is an art, and there are a lot of things to think about that you may not have, all of which will affect how the remodeling job turns out. A designer is qualified and has years of expertise to know what has to be done to enhance the bathroom Floor Tiles Buffalo Grove or the general design.

Your Budget Might Be Assisted By A Designer.

A budget is required before starting any small bathroom remodel Buffalo Grove projects. If you don’t have one, you can wind up spending a lot of money since you won’t have anything to refer to.

If you don’t use caution while working within a budget, you’ll probably go over it. You may prevent this by working with a designer. Your budget may be maintained by a designer by cutting out pointless costs. They may also assist you in locating less expensive goods so you can get what you desire.

Your Bathroom Design May Be Assisted By A Designer.

Make sure you have a plan in place to guide you through the bathroom renovation process before you get started. A plan will outline the workload and everything that needs to be done, ensuring that nothing is missed. It could be challenging for you to develop a strategy on your own, but a designer might be able to help.

ProTip Observation:

No matter how difficult it seems, a designer can help you with any design. They know how to combine elements depending on your suggestions to produce something that satisfies all of your needs.

A Designer Can Assist You With Space Organization.

It’s important to have adequate space while redesigning a bathroom. Though it’s usually the smallest room in the home, the bathroom may make a big impact on your life depending on how you utilize it. A designer can find open space even when you can’t see it. They’ll help you make the most of your available space so that everything fits. They’ll use fixtures that don’t seem out of place or are too large for the bathroom.